How to Move or Restore Default Location of Pictures Folder in Windows 11?
The Pictures folder in Windows 11 serves as a default storage location for your photos and images. However, you may find it necessary to move the Pictures folder to a different location on your computer or restore it to its original default location. Whether you want to organize your files better or resolve issues related to the folder’s location, Windows 11 provides a straightforward method to move or restore the Pictures folder. In this blog post, we’ll guide you through the steps to accomplish this, empowering you to manage your picture files efficiently.
How to Move or Restore Default Location of Pictures Folder in Windows 11?
To move or restore the default location of the Pictures folder in Windows 11, you can follow these steps:
- First, open File Explorer by pressing the Windows key + E.

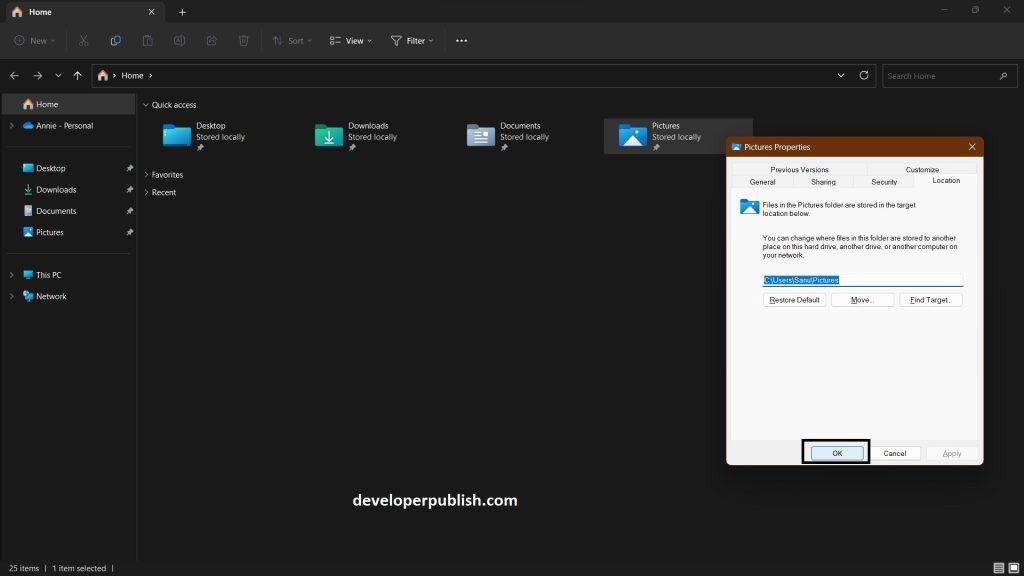
- Right-click on the “Pictures” folder in the left-hand navigation pane and select “Properties”.

- In the Properties window, go to the “Location” tab.
- Click on the “Move” button and select the new location where you want to move your Pictures folder.
- If you want to restore the default location of the Pictures folder, click on the “Restore Default” button.

- If you moved the Pictures folder to a new location, Windows will ask you if you want to move all the files from the old location to the new one. If you choose “Yes”, Windows will move all the files to the new location.
- Once you have selected the new location, click on the “Apply” button, then on the “OK” button.
- Windows will ask you if you want to move all the files from the old location to the new one. If you choose “Yes”, Windows will move all the files to the new location.

- Finally, close the Properties window.
After following these steps, the Pictures folder will be moved or restored to its default location in Windows 11.
Moving or restoring the default location of the Pictures folder in Windows 11 allows you to customize your file organization and resolve any issues related to the folder’s location. By following the steps outlined in this guide, you can easily accomplish this task through the File Explorer. Whether you need to move the Pictures folder to a different location for better organization or restore it to the default location, Windows 11 provides a straightforward process. Take control of your picture files and ensure they are stored exactly where you want them, optimizing your file management experience in Windows 11.


Leave a Review