Creating Hello “Windows Phone 8” App for Windows Phone
Creating Hello “Windows Phone 8” App for Windows Phone. Title sounds somewhat different isn’t it?
When a new API or SDK is released, a developer usually tries out the “Hello World” app as the first app. In this blog let’s try out a “Hello Windows Phone 8” app instead of a traditional Hello World App 🙂
If you are already a Windows Phone developer, then you might want to skip post. But, a new developer interested in the Windows Phone development might find this useful.
To get started with the Windows Phone 8 development, make sure that you have the following prerequisites
1. Windows 8 PC
2. Download and install Windows Phone 8 SDK.
Launch the Visual Studio 2012 from the Windows 8 start screen by clicking on the Visual Studio 2012 Tile.
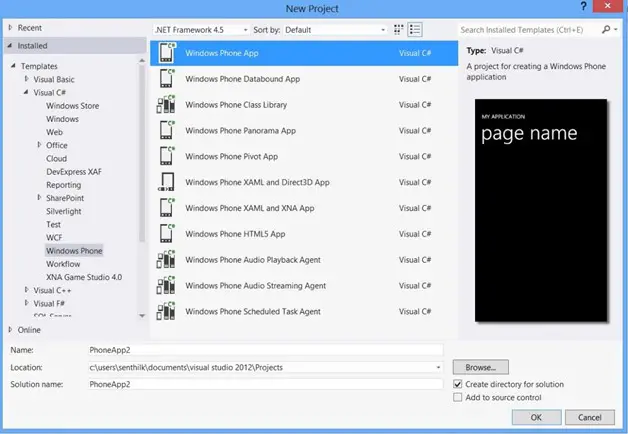
In the Visual Studio 2012, Navigate to File -> New Project. In the New Project Window Dialog, select the language from the left sidebar that you want to develop the Windows Phone 8 App and then Windows Phone. This will display the list of templates that are available for developing Windows Phone 8 Apps.
Select Windows Phone App from the template list. Provide a meaningful name for the Windows Phone Project and choose the path where you want the source code to be copied. Click OK.
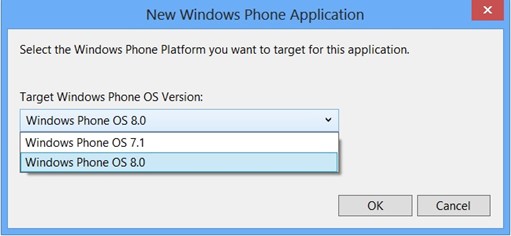
This will prompt you to select the option to target the Windows Phone OS Version like Windows Phone 8 and Windows Phone 7.1.
For this example, let’s select Windows Phone OS 8.0 and click OK.
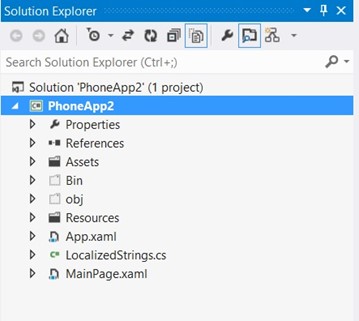
The Visual Studio 2012 will create the necessary files in the Windows Phone project. The solution explorer should contains the files similar to the below screenshot.
Drag and drop a Text Block on to the MainPage.xaml and set its text property to “Hello Windows Phone 8”.
Below is the MainPage.XAML
<phone:PhoneApplicationPage

x:Class="PhoneApp2.MainPage"

xmlns="http://schemas.microsoft.com/winfx/2006/xaml/presentation"

xmlns:x="http://schemas.microsoft.com/winfx/2006/xaml"

xmlns:phone="clr-namespace:Microsoft.Phone.Controls;assembly=Microsoft.Phone"

xmlns:shell="clr-namespace:Microsoft.Phone.Shell;assembly=Microsoft.Phone"

xmlns:d="http://schemas.microsoft.com/expression/blend/2008"

xmlns:mc="http://schemas.openxmlformats.org/markup-compatibility/2006"

mc:Ignorable="d"

FontFamily="{StaticResource PhoneFontFamilyNormal}"

FontSize="{StaticResource PhoneFontSizeNormal}"

Foreground="{StaticResource PhoneForegroundBrush}"

SupportedOrientations="Portrait" Orientation="Portrait"

shell:SystemTray.IsVisible="True">

<!--LayoutRoot is the root grid where all page content is placed-->

<Grid x:Name="LayoutRoot" Background="Transparent">

<Grid.RowDefinitions>

<RowDefinition Height="Auto"/>

<RowDefinition Height="*"/>

</Grid.RowDefinitions>

<!--TitlePanel contains the name of the application and page title-->

<StackPanel x:Name="TitlePanel" Grid.Row="0" Margin="12,17,0,28">

<TextBlock Text="MY APPLICATION" Style="{StaticResource PhoneTextNormalStyle}" Margin="12,0"/>

<TextBlock Text="MobileOSGeek" Margin="0,-7,0,0" Style="{StaticResource PhoneTextTitle1Style}"/>

</StackPanel>

<!--ContentPanel - place additional content here-->

<Grid x:Name="ContentPanel" Grid.Row="1" Margin="12,0,12,0">

<TextBlock HorizontalAlignment="Left" Height="30" Margin="43,42,0,0" TextWrapping="Wrap" Text="Hello Windows Phone 8" VerticalAlignment="Top" Width="310"/>

</Grid>

<!--<Image Source="/Assets/AlignmentGrid.png" VerticalAlignment="Top" Height="800" Width="480" Margin="0,-32,0,0" Grid.Row="0" Grid.RowSpan="2" IsHitTestVisible="False" />-->

</Grid>

</phone:PhoneApplicationPage>
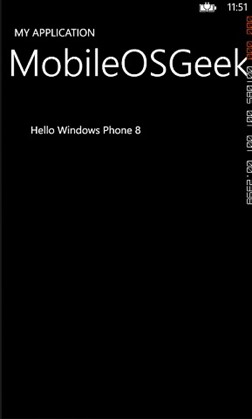
Hit F5 on your Visual Studio. This will start the Windows Phone 8 Emulator and soon you should see the first “Hello Windows Phone 8” app running on the Windows Phone 8 emulator.



Leave a Review