When dealing with a relational database management system (RDBMS) like SQL Server, compatibility level is an important concept to understand. Compatibility level refers to the version of SQL Server with which a database is compatible. In this blog post, we will discuss the compatibility level of a database in SQL Server and how you can view and change it.
Compatibility Level of a Database
The compatibility level of a database in SQL Server determines how certain features of the SQL Server version are supported in the database. Compatibility levels can be set to one of several values, which indicate the version of SQL Server with which the database is compatible. The following table lists the compatibility level values for SQL Server versions:
| SQL Server Version | Compatibility Level |
|---|---|
| SQL Server 2019 | 150 |
| SQL Server 2017 | 140 |
| SQL Server 2016 | 130 |
| SQL Server 2014 | 120 |
| SQL Server 2012 | 110 |
| SQL Server 2008 R2 | 100 |
| SQL Server 2008 | 90 |
| SQL Server 2005 | 80 |
| SQL Server 2000 | 80 |
As shown in the table, the compatibility level can range from 80 to 150, with higher numbers indicating compatibility with newer versions of SQL Server. The compatibility level of a database can be set or changed using SQL Server Management Studio or Transact-SQL.
Viewing Compatibility Level in SQL Server Management Studio
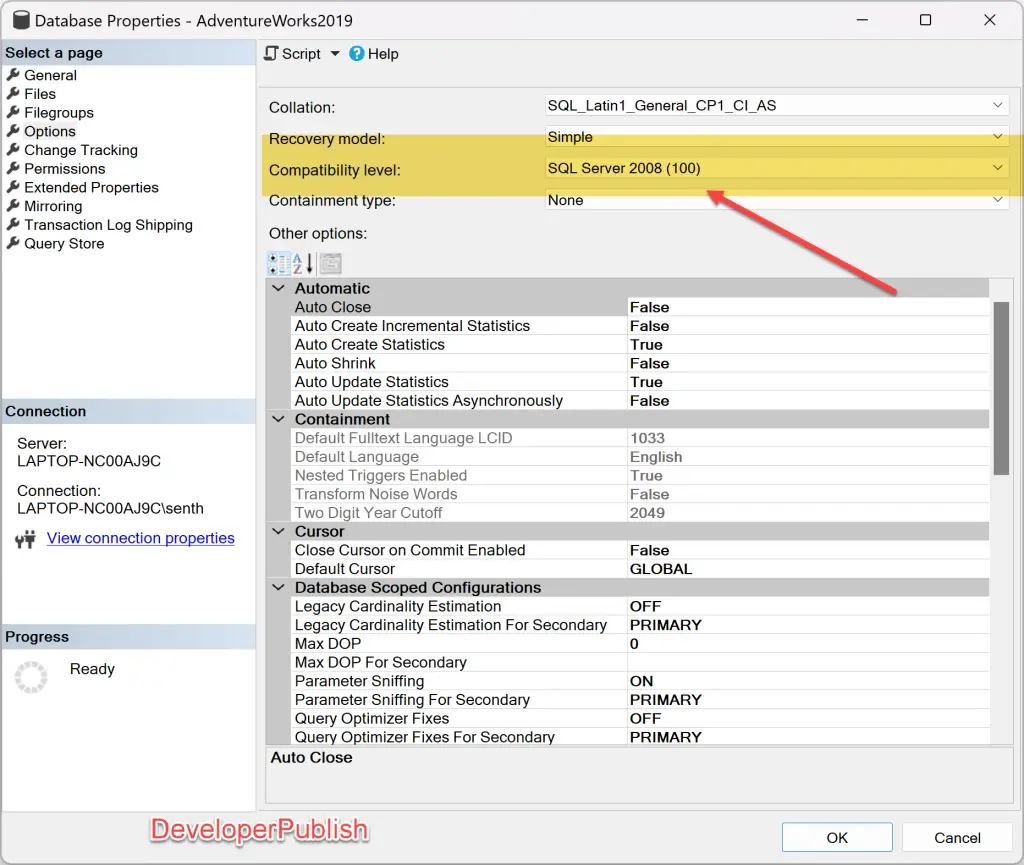
To view the compatibility level of a database in SQL Server Management Studio, follow these steps:
- Open SQL Server Management Studio and connect to the SQL Server instance.
- Expand the Databases folder and locate the database whose compatibility level you want to view.
- Right-click the database and select Properties.
- In the Database Properties dialog box, select the Options page.
- Scroll down to the Compatibility level option to view the current compatibility level.
Changing Compatibility Level in SQL Server Management Studio
To change the compatibility level of a database in SQL Server Management Studio, follow these steps:
- Open SQL Server Management Studio and connect to the SQL Server instance.
- Expand the Databases folder and locate the database whose compatibility level you want to change.
- Right-click the database and select Properties.
- In the Database Properties dialog box, select the Options page.
- Scroll down to the Compatibility level option and select the desired compatibility level from the drop-down list.
- Click OK to save the changes.
Changing Compatibility Level Using Transact-SQL
To change the compatibility level of a database using Transact-SQL, use the following syntax:
ALTER DATABASE database_name
SET COMPATIBILITY_LEVEL = compatibility_level
In the syntax, replace database_name with the name of the database you want to change and compatibility_level with the desired compatibility level.
For example, to change the compatibility level of a database named “AdventureWorks” to SQL Server 2019 (compatibility level 150), use the following command:
ALTER DATABASE AdventureWorks
SET COMPATIBILITY_LEVEL = 150
Note that changing the compatibility level of a database can have implications for its performance and functionality. Before changing the compatibility level, you should thoroughly test your applications to ensure they are compatible with the new level.