How to Quickly find Wi-Fi Password on your Windows PC?
In this post, you’ll learn how you can quickly find the wi-fi password on your Windows 11 and Windows 10 PC in simple steps.
The WiFi password for the currently connected network or any stored networks can be found on Windows 11 and Windows 10 PC.
To enable someone with a laptop join the same wireless network, for example, or to remember it for later use, it can be useful to be able to figure out this information.
There are two ways in which you can find the Wi-fi password on your Windows PC.
- Using Control Panel and Wi-Fi Settings
- Using Windows Command Prompt or Windows Terminal
How to Find Wi-Fi Password on your Windows PC via Control Panel?
- Launch Control Panel on your Windows PC
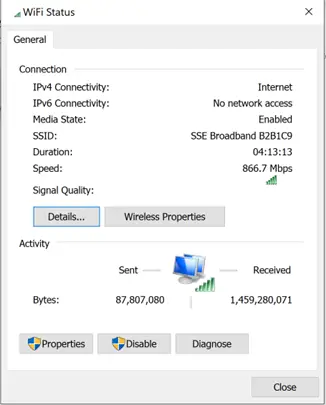
- Click on “Network and Internet” -> “Network and Sharing Center” -> “Change Adapter Settings” and then select the Wi-fi Adapter to view the information.
- In the Wi-Fi Status Dialog, click “Wireless Properties” button

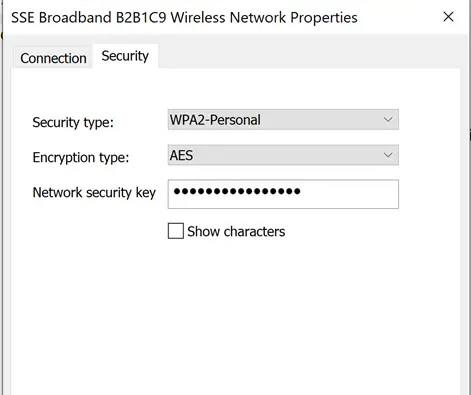
- In the Wireless Network Properties Dialog, you can Check the Show characters box in the “Network security key” section to see the WiFi password.

How to find the Wi-Fi Password on Windows PC using Command Prompt?
Only the network to which you are now connected’s WiFi password can be viewed using Control Panel.
Use Command Prompt if you wish to view the password you’re currently using or any saved WiFi networks on your Windows computer.
On PowerShell, these procedures will also function.
- Open Windows Command Prompt or Windows Terminal and then type the below command to view the list of all the Wi-Fi networks that your Windows PC is Connected to
netsh wlan show profiles
- To find the WiFi password for a specific network, use the command below and press enter
netsh wlan show profile name=”SSE Broadband B2B1C9″ key=clear
Replace “SSE Broadband B2B1C9″ with the network that your Wi-fi Network.
This will display the information about your Network, just search for “Key Content” under the “Security Settings” to see your Wi-Fi Password.


Leave a Review