How to Install ASP.NET MVC using Web Platform Installer?
In this blog post, I will share some information of how to install ASP.NET MVC and setup the development environment.
If you are using Visual Studio 2012, then the templates for ASP.NET MVC 2, ASP.NET MVC 3, and ASP.NET MVC 4 are available out of the box. If you are using Visual Studio 2010, then by default ASP.NET MVC 2 is only available but you can install the MVC 3 or MVC 4 templates if needed using Web Platform Installer.
The Web Platform Installer is a simple tool and provides one of the easiest way to install the latest tools not just related to Microsoft technologies like IIS Express, SQL Server Express, MVC etc. but also tools like WordPress, DotnetNuke, Joomla etc.
It is a free download. You can download the Microsoft Web Platform Installer 4.0 from the Microsoft Web Platform Installer website
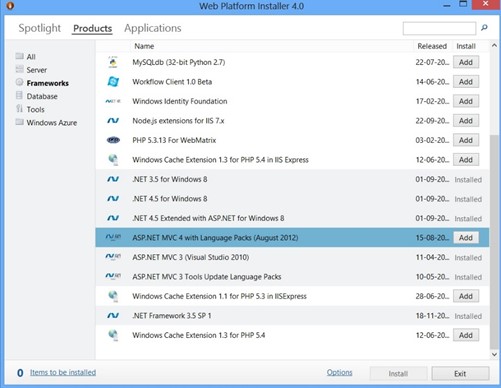
Just install the Microsoft Web Platform Installer 4.0 and launch it, select the appropriate tools that you wish to install from the list and click “Add” and then complete the installation.
As an example, let’s select ASP.NET MVC 4 from the list in the Web Platform Installer and then click “Add” button and then click the “Install” button in the bottom of the screen.
How to Install ASP.NET MVC using Web Platform Installer? – 1
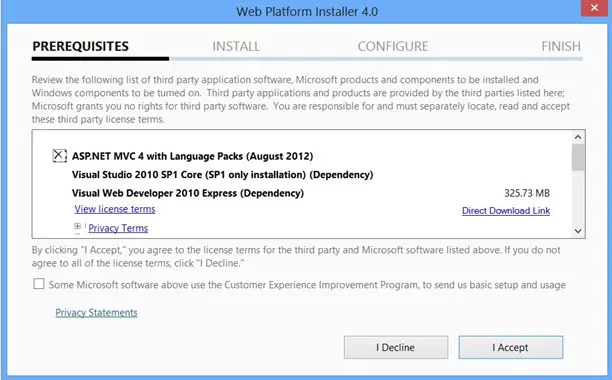
This will prompt to accept the license terms. Click “I Accept” and follow the instructions in the Dialog to complete the installation.
How to Install ASP.NET MVC using Web Platform Installer? – 2
Within few mins, ASP.NET MVC 4 should be installed on your PC and the templates should now be available in Visual Studio 2010 for developing ASP.NET MVC 4 Applications.


Leave a Review